Wednesday, December 16, 2020

Exam AZ-303: Microsoft Azure Architect Technologies Study Guide

I recently passed the AZ-303 exam. Below are some of the resources I used to prepare for the exam. In addition to the links below, I also used Alan Rodrigues' course on Udemy. 

https://www.udemy.com/course/az-102-azure-administrator-certification-transition/

The Udemy course and Microsoft Docs are enough to pass the exam. The course has some good practice exams and labs that align well with what you'll see on the real exam regarding difficulty. I was scoring in the high 90's on the Udemy exams. On the real exam, my score was 923. So, I think, if you comprehend the material well, and get high scores on Udemy practice exams, you'll do well on the real exam.

Just wanted to share my experience, hopefully it helps.

Implement and Monitor an Azure Infrastructure (50-55%)

Implement cloud infrastructure monitoring

Implement storage accounts

Implement VMs for Windows and Linux

Automate deployment and configuration of resources

Implement virtual networking

Implement Azure Active Directory

Implement and manage hybrid identities

Implement Management and Security Solutions (25-30%)

Manage workloads in Azure

Implement load balancing and network security

Implement and manage Azure governance solutions

Manage security for applications

Implement Solutions for Apps (10-15%)

Implement an application infrastructure

Implement container-based applications 

Implement and Manage Data Platforms (10-15%)

Implement NoSQL databases

Implement Azure SQL databases

Thursday, November 26, 2020

Azure AD Sync - Set-MsolDirSyncEnabled : You cannot turn off Active Directory synchronization.

 I recently ran into a situation in my lab environment that required I resync all (2000+) user accounts to Azure AD. Though this sounds complex and daunting, its actually quite simple. T


he basic steps involve disabling sync, and then removing the user objects. This can all be done with two PowerShell commands:

1) Set-MsolDirSyncEnabled -EnableDirSync $false


2) Get-MsolUser -All | Remove-MsolUser -force


The account that you are currently running the commands as will not be removed. 

To enable Azure AD Sync, you simply reverse the boolean operation on the Set-MsolDirSyncEnabled cmdlet above. However, I ran into an issue when trying to enable Azure AD Sync. 


After some research, it turns out you must wait a period of time (up to 12 hours in some cases) before you can make a second change to the Azure AD Sync status. This error simply means that we made a recent change to Azure AD Sync, and we must wait before making another change. To prove this, there is a "DirectorySynchronizationStatus" member for the Get-MsolCompanyInformation cmdlet. If we take a look at this member, we can see the status is "PendingDisabled". 


Check the status of this periodically over the next 12 hours or so, and once it says "Enabled" or "Disabled", you should be able to change the state once more. 

Thursday, November 19, 2020

Azure VM Scale Set - Get Instance IP Address


If you are using VM Scale Sets in Azure, you know how important it can be to quickly obtain an instance IP address. This can of course be done using the Azure Portal. However, I am often working in a shell or VSCode, and I do not want to leave the comfort of my shell to login to the portal.

There are a few options we have for retrieving information about a VMSS and its instances without using the Azure Portal. We can use PowerShell or the Azure CLI. Being that I am constantly flipping between Windows and Linux, I will detail both here.


You will need to have the AZ module installed. To install this module, simple open PowerShell (as admin) and type in “Install-Module -Name az”. To get the IP address of the instances within a scale set, use the following script:

https://github.com/rnemeth90/Get-VmssInstanceIpAddress

You can also use the Azure CLI to obtain individual instance IP addresses. This method is much simpler than PowerShell, and only requires one line of code:

az vmss nic list --resource-group myResourceGroup  --vmss-name myVmss | grep -w "privateIpAddress"


Tuesday, November 17, 2020

Azure Policy - Allowed Locations for Resource Deployment


Azure Policy allows us to control what actions users can perform regarding creating and managing resources in Azure. We can define policies for naming standards, require that certain extensions be installed on virtual machines, audit various resources for certain configurations… the possibilities are endless.

In this article, well focus on defining what locations users can deploy resources in. To get started, login to the Azure Portal and search for “Policy”.


Click on “Definitions”. Here you will find several built-in definitions that can be applied to your resources. Definitions are a json template containing the logic for what you want to accomplish. It is worth investing some time to look through these built-in definitions.

In the “search” field, type in “location”. Then, click on the “Allowed Locations” definition.


Here you can see the json content of the definition. The “policyRule” section is the bread and butter of the definition. In this particular example, the policyRule states that if the location that the user is deploying a resource to is NOT a) in the list of allowed locations, b) global, or c) a b2c directory, then deny the deployment.


Next, click on “Assign”.


You can assign the policy to a subscription or resource group. You can also create exclusions in this same window, and enable or disable the policy.

Click “Next”, and on the Parameters page, choose the allowed locations from the drop down menu. Then click next.

Azure Policy has the capability to remediate non-compliant resources. An example would be having a policy that requires anti-virus be installed on all servers. If Azure Policy detected a server that did NOT have anti-virus installed, it would use a managed identity to install AV software on the server. This particular policy does not need a remediation action, so we will just click “Next” here.

On the Review + Create window, review the resource and then click “Create”.

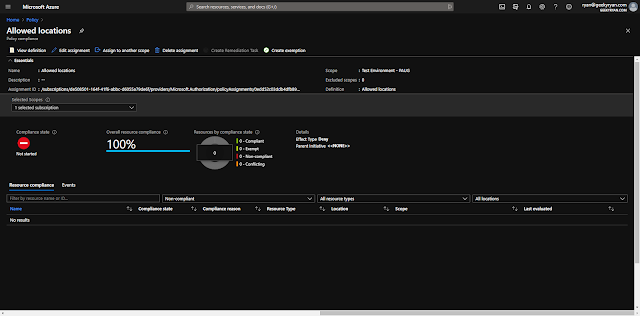
Back on the Azure Policy blade, select “Assignments”. We can now see that our new policy is assigned.


Back on the “Overview” page, you can track compliance for the policy. We can see here that compliance for the “Allowed Locations” policy assignment has not yet been started. This typically takes an hour or so before the compliance state is updated.


Click on the Policy to get a more detailed view of compliance, view the definition, edit the assignment, and even create exemptions.


Tuesday, November 3, 2020

Replicate an Azure VM Image Between Regions


Let’s say you have a VM in Azure North Central. You created this VM from a custom image that you maintain in an Azure image repository. Now, what if you wanted to create that same VM in Azure South Central, and use the same reference image? A standard image repository is limited to the region that it exists in. The answer here is to create a Shared Image Library, add the image to it, and then configure the image to replicate to other Azure regions.

This article assumes you already have an image.

First, create a Shared Image Gallery in Azure. Browse to the Azure portal (https://portal.azure.com), and (from the home page) click “create a resource”. 


Search for “Shared Image Gallery” and then click “Create”.

Configure a subscription, resource group, and then name the Shared Image Gallery and configure what region you want it to live in. You will want to create it in the same region as your standard image repository.


If you want to assign some tags to this new resource, continue to the next page. Otherwise, click “Review + Create”.


On the final page, if the validation is successful, click “Create”.


It should take less than a minute to create the shared image gallery. Once its created, click “Go to resource”. 


In the shared image gallery blade, click “Add new image definition”.


On the next page, select the region where your existing image repository lives, give the image definition a name, and then fill out the rest of the information as needed. The publisher will typically be the name of your company/organization. The offer will typically be set to the name of the overall application, being that servers typically host one piece of an application (example: database servers vs. application servers). The SKU will typically be set to the name of the component within the application (for example, a web server or database server).


Next, configure an image version. This should use the typical semantic format used in software development (major version, minor version, patch level). I will typically substitute the patch level with the date the image was captured. Probably not a best practice, but something that has served me well in the past.

Next, select the source image. This will be the image that you are copying from your standard image repository. You can also configure an end of life date for the image version here if you wish. In the “Target Regions” section at the bottom, select the region where you plan to create the new VM. Also select the target storage account type.


You can configure some publishing options and tags on the following pages. Though, it is not required. Click “Review + create”.   After the validation passes, click “Create”.


This process will take a few minutes to complete. Once its finished, click on “go to resource”. You now have an image that is available to be deployed in the north central region or the south central region.

Friday, October 30, 2020

Reset GRUB/root Password for vCenter/PSC Appliance

In Redhat/Fedora/Cent, GRUB can be protected by running the grub-md5-crypt command and pasting the outputted password hash into the grub.conf file. vSphere 6.0 password protects grub by default. If you change the root password in the VAMI, the GRUB password is changed to match. If you do not change the root password, the GRUB password is "vmware".

To reset the GRUB password, we need to boot into a Cent or Redhat live CD. The ISO can be obtained here: https://www.centos.org/download/. Its best to upload the ISO to a datastore that the appliance has access to.

Stop the appliance and attach the ISO:


Be sure to select the "Connect at Power On" option. Boot the VM into the ISO and select the "Troubleshooting" option. 


Next, choose "Rescure a Red hat (or CentOS depending on your ISO) Enterprise Linux System"


Select “Continue” to mount the VCSA 6.0’s  root filesystem in Read/write mode under /mnt/sysimage.  RHEL 7.2 is capable to detect the VCSA’s root volume and mounts it.


The VCSA root filesystem is mounted under /mnt/sysimage and you can now access (and modify) it using the shell. Navigate to /mnt/sysimage/boot and list the contents. You'll see we now have access to the grub directory:


cd to the grub directory and list the contents. Look for a file called "menu.lst". This file holds the grub boot loader password. Open this file with vi by typing "vi menu.lst". Navigate to the line beginning with "password" using the arrow keys, and then type "dd" to remove the line. 


You can then save the file by pressing ":wq" (without quotes). You can now cat the file and see that the password has been removed. 


Exit the shell (this will reboot the server). Detach the ISO and boot the appliance. Once the system is booted, stop the VCSA in the GRUB menu (by pressing the escape key during boot) to break the OS root password. 


Press "e" to edit the boot commands for the kernel. 


Append "init=/bin/bash" to the line in this step and press enter.


Press "b" to boot the system. 


You will now boot into a bash shell where you can set the root password.


Once this is done, exit the shell by typing "exit". You can now boot the appliance and login with your new root password. 


Deploy a New ADDS Forest on Server 2019 Core


Prerequisites:

1)      Change server name and IP address

2)      Configure time settings and NTP


In this post we will be reviewing the basic installation of the Active Directory Domain Services role and setup of a new forest on Windows Server Core 2019.

To get started, login to your server with administrator privileges. You will first need to type in “powershell” in the cmd prompt to start powershell. Once you do that, type in the following command to install the Active Directory Domain Services role:


After installing the role, we’ll continue by creating a new ADDS Forest and promoting this server to the primary domain controller.

First, we’ll need to gather a password. This password will not be used for a domain user account. The local administrator on this server will become the domain administrator account for the domain. The password we’re gathering in the next step will be used for Directory Services Restore Mode (DSRM). DSRM is a recovery mode used to recover domain controllers that won’t boot up.  We technically only need a password, not a username for this account. Type in the following:

$cred = Get-Credential

 In the username field for the credentials prompt below, just type in anything you want, as the value will not be used. This prompt will store our username/password in a variable object. We can then access the password within the credential object by typing

$cred.password

We can see that this password is stored as a secure string object. Let’s continue on with the Directory Services installation.


Once we have our credential variable, we can install a new forest and domain controller using the command below. Let us break down what this cmd is doing:


Install-ADDSForest: The powershell cmdlet to create a new forest and domain controller

-DomainName: The domain name to be used for the forest

-DomainNetBiosName: The domain “Short name” to be used for the forest. This is the value used when you type in a username in the domain\username format. Example “myDomain\bgates”.

-SafeModeAdministratorPassword: The value we captured in our credential prompt above. This is used for Directory Services Restore Mode. This mode can be accessed by pressing F8 while the server is booting. It is commonly used for recovering a failed domain controller.

-DatabasePath: The path for the Active Directory database. It’s a best practice to put this database on its own disk.

-LogPath: The directory for ADDS log files

-DomainMode: The domain functional level. The domain functional level specifies the attributes and capabilities available to objects within the domain. The higher the level you choose, the more features will be available to you.

-ForestMode: The forest functional level. Similar to the domain functional level but applies to the entire forest.

-InstallDNS: Install the DNS role alongside the ADDS role.

-WhatIf: This is a powershell “thing”. Most cmdlets have the “whatif” parameter. It basically allows you to run the cmdlet in “test” mode without actually making any changes to your environment. Once you’re happy with the output, you can remove the “whatif” parameter and run the command to install ADDS and promote this server to a domain controller.

Wednesday, October 28, 2020

Could not connect to VMware Directory Service via LDAP when Deploying New vCenter Appliance


Problem:

Deploying a brand new vCSA 6.7 appliance results in the following error during the second stage of the deployment.


Solution:

This problem is almost always caused by DNS resolution. Once you create the appropriate A and PTR record for your appliance on a LOCAL DNS server, you should be to successfully complete the deployment. Local DNS resolution is required, you cannot use a public DNS server while installing vCenter. For example, 8.8.8.8 will not work.

Since you have already completed Stage 1 of the deployment, you can login to the appliance via SSH and update the DNS settings. This will only work if you chose to enable SSH during Stage 2 of the deployment. 

SSH to the appliance and run "/opt/vmware/share/vami/vami_config_net" (without quotes). Choose option 4 to update DNS settings and option 3 to update the hostname (if necessary). The deployment wizard states that a hostname is optional, but it is actually required. I have never had a successful deployment without specifying the hostname.  


You can then verify the DNS settings have been updated in the resolve.conf:


Wednesday, October 7, 2020

Cisco AnyConnect - VPN Establishment Capability from a Remote Desktop is Disabled

I ran into this issue this morning when attempting to setup a VPN on a Hyper-V virtual machine. After an hour of searching the Google machine and troubleshooting, I came upon this solution. 


Upon installation, AnyConnect pulls down a profile from the ASA containing several settings. This profile is in xml format and is located (on a Windows machine) at %programdata%\Cisco\Cisco AnyConnect Secure Mobility Client\Profile\AnyConnectProfile.xsd. 

To resolve this issue and connect to your VPN, open this file with notepad (or any text editor, run as admin), search for the "WindowsVPNEstablishment" tag, and modify the value. The default value is "LocalUsersOnly", you will need to change it to "AllowRemoteUsers". Save and close the file, then restart the machine. 


BEFORE:


AFTER:


Tuesday, August 21, 2018

Active Directory Migration Toolkit - The RPC Server is Unavailable (hr=0x800706ba)


When migrating computer objects using the Active Directory Migration Tool, you may encounter the following error:


In addition, the Migration Log may show the following error:


This is typically caused by a host-side firewall. To resolve this, deploy a GPO to disable the Windows firewall prior to migrating the computer account. I like to create a special OU for computers (I typically name it “PreMigration”) that I will move computer objects to prior to migrating them. This OU will have two policies applied. One to disable the Windows Firewall and another to start the Remote Registry service. Both are required for the computer object to successfully migrate.

Azure Site Recovery - VMware-to-Azure: Wrong IP address discovered for VM


When replicating virtual machines from VMware to Azure using Site Recovery, you may encounter an issue where the Configuration server discovers the wrong IP address for a VM. This can be caused by stale entries within the infrastructurevms MySQL table that is used by ASR to track VM attributes. 

To resolve this issue, you first need to disable replication for the VM in the Azure Portal.


Next, login to your ASR Configuration Server and open a CMD prompt as administrator. Browse to the bin directory for your ASR installation. For example, in my case ASR is installed on the E: partition under the following directory:

E:\Program Files (x86)\Microsoft Azure Site Recovery\home\svsystems\bin

Type in this command to remove the VM from the ASR database (replace IP address with the IP of your VM):

perl Unregister-ASRComponent.pl -IPAddress 10.0.0.4 -Component Source

That’s it. You should now be able to reconfigure replication for the VM, and ASR will discover the correct info about the VM.

Thursday, July 26, 2018

Azure AD Connect No-Start-Connection

This morning, I ran into an issue with Azure AD Connect that I had never seen before. I received an email alert from Azure AD stating that Password Synchronization was not working for my forest, and the suggested fix was to restart the ADSync service on the server. I restarted the service and then forced a sync to verify it was working.

After forcing the sync, I opened miisclient and noticed some strange errors. We sync multiple on-prem AD forests to Azure AD, and the status for one of them was “no-start-connection”. That error in itself does not seem significant to me. However, after clicking on the “failed-connection” link in the Connection Status pane, things became much more clear.


The domain controllers for the forest in question are in a datacenter that is geographically separated from the datacenter that our Azure AD Sync server lives in. The two sites are connected via a S2S VPN.

There was obviously some type of connection issue between our two datacenters. In my case, the issue was transient, and resolved itself after a few minutes. But if you’re experiencing this error message, check your L2/L3 connection. Also, verify DNS is working and someone didn’t make changes to your firewall(s). Just walk up or down the OSI model and you’ll eventually find the problem.

Wednesday, July 18, 2018

Azure AD Connect Health: Latest Data is not Available in Azure Portal


I recently had to create a new Azure AD Connect server, and found that it was not able to report health status in the Azure Portal. After some troubleshooting/research, I was able to get the health status report working by registering the health agent on the server with Azure AD Health Services. Doing this involves running one PowerShell cmdlet on your AD Connect server and providing global administrator credentials.  


First, let’s test the status of the agent communication:


If you do not receive any errors, that means the Azure AD Connect Health agent on your server is able to successfully communicate with the cloud service. Now, let’s register the agent:


You will be prompted for credentials. The credentials you provide need to be a global administrator account in your Azure AD tenant.


You should receive some output stating that the registration is successful (or it failed).


 Now, just go back to the Azure Portal and refresh the page. The message stating that the
"latest data is not available" should be gone.